I spent this afternoon, trying to update my old Redux application. It has been quite a long time since my last commitment. I have to update my react version and also need to convert my react class component into the react hooks. But, other than that, Here are some thoughts and notes I have for the Redux portion.
I had a really hard time when I first got in touch with Redux. I thought it was so complex and the setup process is not developer-friendly ( probably I had the bad luck to try my very first redux on a big-scale project ). Anyway, I feel now I’m getting more familiar with it.
There are supposed to be three parts on the redux side.
Action creator : Here is what I make the HTTP request to the back end.
Reducer : The place I put data in a format and prepare it for the store to put in.
Store : Where I save all the data and also apply any middleware here.
So, I’m going to walk through one path of the query process ( how I use redux to get all my record data in DB ). I think that is the quickest way for us to have a brief knowledge of how the redux store has been built and worked.

I included the action creator and reducer in one file. The thunk creator is part of the action creator, it will act as the ‘middle man’ to handle between the front-end call and the back-end request in a promised way. Like on line 26, the front-end call function fetchRecord triggers the Axios to make an HTTP request together with the data from the back-end. Then, we pass the result to the function getRecord on line 15. Thus, we can add an ActionType as a way for the reducer to identify which action is which. Finally, we format all the action data in the Reducer and are ready to pass it into the store below.
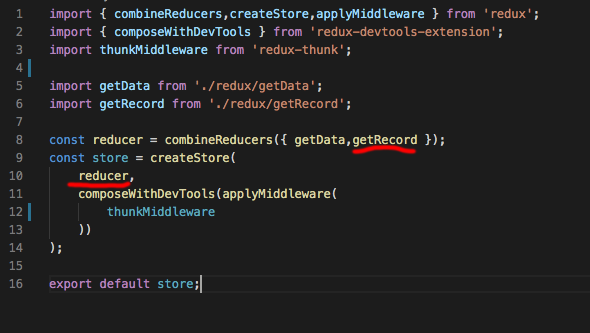
Here I go to the store file. I import the action creator above into the store on line 6 ( you can also notice that I have another action creator on line 5). On line 8, I combine all those files together into a big reducer and pass it into the store. It’s also a good chance to include any middleware in the store as well ( ThunkMiddleWare in my case ).
That’s a quick walkthrough of how I set up my redux store. Now, Let me show you how can I use the new redux store at the front end.
First thing first, we need to connect our Redux store to the front-end file. I need to find the root file in the front end and make the connection there ( so the child components will have access to the stored data ).
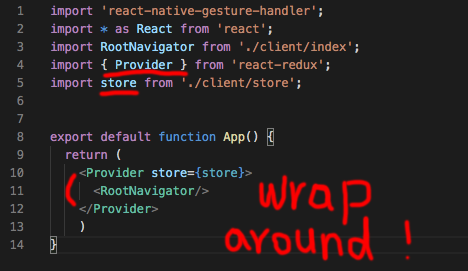
I import the store file we just created together with the ‘provider’ tag from react-redux. Then, I just do the action to wrap around the root file with our provider tag which connects our store file to the front end.

This is the final step. So, we are in one of the child components now. You should notice there are two functions on lines 39 and 46 ( ‘mapState’ and ‘mapDispatch’ ). MapState is used to gather the data and place it in our props, whereas, mapDispatch is trying to place my thunk creator functions in props, so I can make a call of those functions in my react hooks ( like here I try to call ‘fetchData’ and ‘fetchRecord’ on line 18 and 19 through the props ).
On line 22, I console log my props after the initial load. Here are my props below:
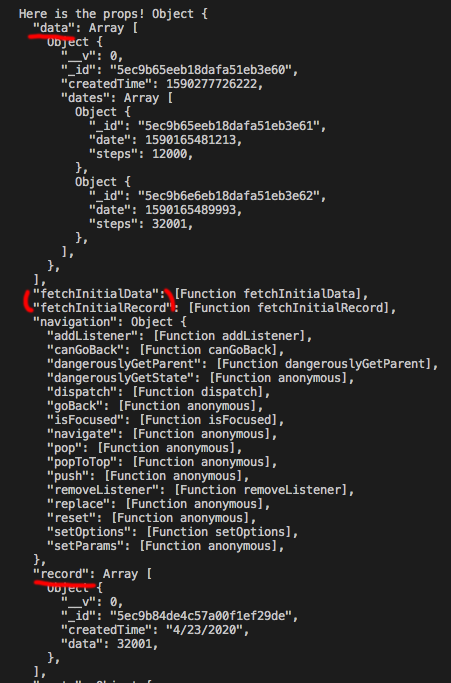
You can see ‘data’ and ‘record’ in my ‘mapState’ function have been printed in the props. Those two fetch functions in the ‘mapdispatch’ are sitting in the props for me to call as well.